Integrating Autogenerated Content Into Your Documentation Site Using Swagger and Jekyll
Integrating autogenerated API documentation with code samples, diagrams, links to related content, or contextual information that doesn’t fit within a docstring is a challenge. This article describes how we do this at Enigma using Swagger (OpenAPI) and Jekyll.
Jekyll is one of the most popular open source static site generators, but it takes a lot of work to turn an out-of-the-box Jekyll installation into a platform capable of hosting your product and API documentation. At Enigma, we adopted Jekyll over a year ago and have been using it along with Tom Johnson’s Documentation Theme for Jekyll—an open source framework that sits on top of Jekyll and provides many of the features technical writers consider essential, like support for multiple products, swappable navigation sidebars, etc. It has proven to be a capable and adaptable platform that has allowed us to maintain multiple documentation sites, both internal and external, along with version support, all from a single source.
One key extension we’ve implemented is a way to integrate our autogenerated Swagger (OpenAPI) documentation with our handwritten documentation (setup instructions, tutorials, etc.). This post explains how this integration works and offers a step-by-step implementation guide.
Before we get started, if you’d like to see an example of documentation that combines autogenerated content with handwritten content, here’s a page from the Enigma Public API documentation that incorporates parameter and response information pulled from a Swagger file. Additionally, here’s a page from the Enigma Public Python SDK documentation that uses the same autogenerated Swagger content with SDK-specific language. A single Jekyll page with some conditional logic generates both of these HTML pages.
About Swagger
Swagger is the de facto way to describe REST APIs, so chances are if you have a REST API then you also have a Swagger spec, or your developers can provide one without too much trouble. The spec defines all the API’s endpoints and parameters, and the responses returned by the API. Generating a new Swagger file is typically part of the build process, so when a developer adds a new endpoint or a new query parameter, the Swagger JSON or YAML file is updated automatically.
If the source code includes a description with every endpoint method and parameter, then the Swagger file displayed within a frontend like Swagger UI may be the only API documentation you need. Frequently, though, you want to provide more than just bare bones autogenerated API documentation. If you want to include, say, code samples in multiple languages, diagrams, links to related content, or contextual information that doesn’t fit neatly within a docstring, you’ll need some way to combine the autogenerated content with handwritten content.
If you’re familiar with Swagger, you’ve probably run into the Petstore example before. I use it here to demonstrate the Swagger-Jekyll integration. It’s good because it has a variety of GETs, POSTs, etc. and uses both body and formData parameters on the PUTs and POSTs. The Petstore spec unfortunately doesn’t have many descriptions, but that’s fine—the point here is to demonstrate how the integration works.
All of the code referenced in this article and a full working demo are available on GitHub:
- https://github.com/peterhend/documentation-theme-jekyll is a fork of Tom Johnson’s Doc Theme repo to which I’ve added a complete implementation of the Petstore API docs generated from the spec.
- https://peterhend.github.io/documentation-theme-jekyll/api_post_pet.html is the site running on GitHub pages.
Getting started
The key piece of Jekyll functionality you’ll use is the Liquid templating language, specifically its ability to read data from JSON and YAML files. These files must be located in your Jekyll project’s _data directory. The first step, therefore, is to put your Swagger file in the _data directory, or a subdirectory of it (see petstore.yml).
Next, you need some code to parse the file and extract the information you want. Since you don’t want to repeat the same or similar code for each endpoint, I put the code in an “include” file that can be included in the doc pages as needed. I created four separate Swagger parsers in _includes/swagger_parsers: one each for models, parameters, and responses, plus a generic parser you can use to extract other endpoint attributes, like the method description. The last one is the most straightforward, so let’s look at an example that uses that one first.
In the Swagger file, the spec for POST /pet/{petId} looks like this:
paths:
/pet:
  post:
    tags:
    - “pet”
    summary: “Add a new pet to the store”
    description: “”
    operationId: “addPet”
    consumes:
    - “application/json”
    - “application/xml”
    produces:
    - “application/xml”
    - “application/json”
    parameters:
    - in: “body”
      name: “body”
      description: “Pet object that needs to be added to the store”
      required: true
      schema:
        $ref: “#/definitions/Pet”
    responses:
      405:
        description: “Invalid input”
    security:
    - petstore_auth:
      - “write:pets”
      - “read:pets”
If you want to extract, say, the summary attribute for POST /pet, the full path to that attribute is:
site.data.swagger.paths./pet.post.summaryThe site.data.swagger portion references the Jekyll project’s _data/swagger directory, while the remainder is the path through the YAML tree to the attribute you want.
To include this directly in your docs, you need to first assign /pet to a variable, because you can’t include the slash (/) character in paths. You can then put the full path inside double braces, referencing the variable:
{% assign path = "/pet" %} {{ site.data.swagger.petstore.paths\[path\].post.summary }}In this case, the code resolves to add a new pet to the store. However, since we want code that isn’t bound to a specific file, endpoint, method, or attribute, we’ll do the following:
- Define the file, endpoint, and method in the host page’s front matter.
- Pass the attribute name as an “include” variable.
The host page Markdown therefore looks like this:
---
title: POST /pet
sidebar: mydoc_sidebar
permalink: api_post_pet.html
swaggerfile: petstore
swaggerkey: /pet
method: post
-–
## Description
{% include swagger_parsers/getattribute.md attribute=“summary” %}
And the “include” file looks like this:
site.data.swagger\[page.swaggerfile\]paths\[page.swaggerkey\]\[page.method\]\[include.attribute\]Where:
- page.swaggerfile, page.swaggerkey, and page.method reference the values specified in the page’s front matter
- include.attribute references the attribute name passed in via the include statement
The finished getattribute.md adds logic to support a type variable you can pass in to indicate if the attribute is a list, rather than a single value (for example, in the consumes and produces sections of the YAML example above).
Reading parameters
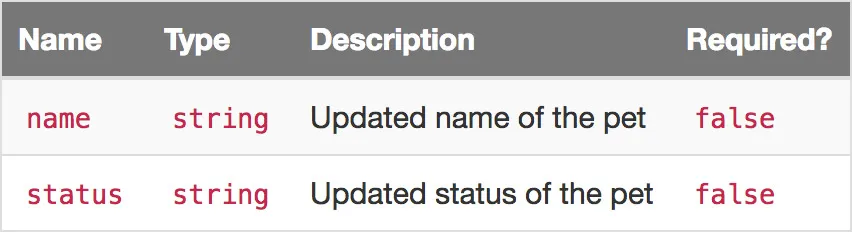
Each API endpoint method typically supports some combination of path parameters, query parameters, and body parameters. Where there are multiple parameters of a given type, it’s typical to display these in a table format, displaying the name, type, description, and “required” status for each (see the POST /pet/{petId} body parameters for an example).
Here’s the parameters section of the POST /pet/petId method:
Paths:
…
/pet/{petId}:
  …
  post:
    …
    parameters:
    - name: “petId”
      in: “path”
      description: “ID of pet that needs to be updated”
      required: true
      type: “integer”
      format: “int64”
    - name: “name”
      in: “formData”
      description: “Updated name of the pet”
      required: false
      type: “string”
    - name: “status”
      in: “formData”
      description: “Updated status of the pet”
      required: false
      type: “string”
It includes one path parameter and two formData parameters, each of which has a name, type, description, and required attribute.
The code to parse this is a little more complicated, as you must loop through the parameters portion of the file and and build an HTML table as you go, but it uses the same techniques introduced in the previous section. First, here’s the host page Markdown, which “includes” three instances of getparams.md, with a different paramtype for each (you can see the rendered version at POST /pet/{petId}):
---
title: POST /pet/{petId}
sidebar: mydoc_sidebar
permalink: api_post_pet_id.html
swaggerfile: petstore
swaggerkey: /pet/{petId}
method: post
-–
## Path parameters
{% include swagger_parsers/getparams.md paramtype=“path” %}
## Query parameters
{% include swagger_parsers/getparams.md paramtype=“query” %}
## Body parameters
{% include swagger_parsers/getparams.md paramtype=“formData” %}
And here’s a simplified version of the getparams.md “include” file:
{% assign parameters = site.data.swagger[page.swaggerfile]paths[page.swaggerkey][page.method]parameters %}
| Name | Type | Description | Required? |
|---|---|---|---|
{{ parameter.name }} |
{{ parameter.type }} |
{{ parameter.description }} | {{ parameter.required }} |
As before, page.swaggerfile, page.swaggerkey, and page.method reference the values specified in the page’s front matter. This time, include.paramtype references the parameter type passed in as a variable. The code loops through each parameter, checks to see if it’s the parameter type we’re looking for, and if it is, creates a table row with the details.
The full version of getparams.md includes code specifically to handle body parameters, since these are defined quite differently and reference the resource model definitions. It also includes code to check whether there are parameters of the specified type before it draws the table head, and handles enums by reading and displaying the allowed values.
Weaving in your own content
The get_pet_findbystatus.md page shows how, with the Swagger integration in place, you can add whatever content you want around it. I added an Examples section with examples for Python, Postman, and cURL, using the tab code provided in the Theme for Jekyll documentation. You can add whatever Markdown, HTML, or JavaScript you want anywhere in the host page. If you’re ambitious, you can even add a live “Try it Out” feature, as we did in the Enigma Public API docs.
Conclusion
Swagger is great—there’s no better way to autogenerate API docs for your REST APIs, but what you get from the Swagger spec alone is often not enough to fully support users of your API. I’ve demo’d one way to integrate the autogenerated docs with your handwritten docs, but see Integrating Swagger UI with the rest of your docs for other approaches you might consider.